Django の admin サイトLink to this heading
Djangoのパワフルな特徴の1つは、自動的に生成されるadminインタフェースです。あなたのモデルクラスからメタデータを読み取り、モデル中心のインタフェースを提供します。このインタフェースのおかげで、ユーザはあなたのサイトのコンテンツを操作することができます。adminサイトのオススメの使い方は、組織内で利用する管理ツールに利用を制限することです。adminサイトは、あなたのサイトのフロントエンドやその周辺を含んだ全体を作成することを意図していません。
adminサイトは、カスタマイゼーションのためのたくさんのフックを持っています。しかしそれらのフックを使う際には気をつけてください。もしあなたが、データベースのテーブルとフィールドを使用しないような、よりプロセス中心のインタフェースを提供する必要があるなら、おそらく自分でビューを書いたほうが良いでしょう。
このドキュメントでは、Django の admin インタフェースを有効にして使用したりカスタマイズする方法について説明します。
オーバービューLink to this heading
adminサイトは startproject で使用されるデフォルトのプロジェクトテンプレートで有効になります。
If you're not using the default project template, here are the requirements:
Add
'django.contrib.admin'and its dependencies -django.contrib.auth,django.contrib.contenttypes,django.contrib.messages, anddjango.contrib.sessions- to yourINSTALLED_APPSsetting.Configure a
DjangoTemplatesbackend in yourTEMPLATESsetting withdjango.template.context_processors.request,django.contrib.auth.context_processors.auth, anddjango.contrib.messages.context_processors.messagesin the'context_processors'option ofOPTIONS.If you've customized the
MIDDLEWAREsetting,django.contrib.auth.middleware.AuthenticationMiddlewareanddjango.contrib.messages.middleware.MessageMiddlewaremust be included.
After you've taken these steps, you'll be able to use the admin site by
visiting the URL you hooked it into (/admin/, by default).
If you need to create a user to login with, use the createsuperuser
command. By default, logging in to the admin requires that the user has the
is_staff attribute set to True.
Finally, determine which of your application's models should be editable in the
admin interface. For each of those models, register them with the admin as
described in ModelAdmin.
他のトピックLink to this heading
ModelAdmin のオブジェクトLink to this heading
- class ModelAdminLink to this definition
The
ModelAdminclass is the representation of a model in the admin interface. Usually, these are stored in a file namedadmin.pyin your application. Let's take a look at an example of theModelAdmin:from django.contrib import admin from myapp.models import Author class AuthorAdmin(admin.ModelAdmin): pass admin.site.register(Author, AuthorAdmin)
register デコレータLink to this heading
- register(*models, site=django.contrib.admin.sites.site)Link to this definition
ModelAdminを登録するために、デレコータも用意されています:from django.contrib import admin from .models import Author @admin.register(Author) class AuthorAdmin(admin.ModelAdmin): pass1 つ以上のモデルが与えられ、
ModelAdminに登録されます。カスタムのAdminSiteを使用している場合、siteキーワード引数を使って渡してください:from django.contrib import admin from .models import Author, Editor, Reader from myproject.admin_site import custom_admin_site @admin.register(Author, Reader, Editor, site=custom_admin_site) class PersonAdmin(admin.ModelAdmin): passYou can't use this decorator if you have to reference your model admin class in its
__init__()method, e.g.super(PersonAdmin, self).__init__(*args, **kwargs). You can usesuper().__init__(*args, **kwargs).
admin ファイルの発見Link to this heading
INSTALLED_APPS 設定内に 'django.contrib.admin' を記述すると、Django は自動的に各アプリケーション内で admin モジュールを探してインポートします。
- class apps.AdminConfigLink to this definition
これは、admin に対するデフォルトの
AppConfigクラスです。Django が開始するとautodiscover()を呼び出します。
- class apps.SimpleAdminConfigLink to this definition
このクラスは
AdminConfigと同じように動作しますが、autodiscover()を呼び出しません。- default_siteLink to this definition
これはデフォルトの admin サイトのクラスやサイトインスタンスを返す呼び出し可能オブジェクトへのドット区切りのインポートパスです。デフォルトは
'django.contrib.admin.sites.AdminSite'です。使い方は Overriding the default admin site を参照してください。
- autodiscover()Link to this definition
この関数は、インストールされた各アプリケーション内で
adminモジュールをインポートするよう試みます。これらのモジュールは admin にモデルが登録されているものと想定されます。通常、この機能を手動で呼び出す必要はありません。Django が開始するとき
AdminConfigが呼び出してくれます。
If you are using a custom AdminSite, it is common to import all of the
ModelAdmin subclasses into your code and register them to the custom
AdminSite. In that case, in order to disable auto-discovery, you should
put 'django.contrib.admin.apps.SimpleAdminConfig' instead of
'django.contrib.admin' in your INSTALLED_APPS setting.
ModelAdmin のオプションLink to this heading
ModelAdmin は非常に柔軟にできています。インターフェイスをカスタマイズするために、様々なオプションが用意されています。すべてのプションは ModelAdmin サブクラスで定義します:
from django.contrib import admin

class AuthorAdmin(admin.ModelAdmin):
    date_hierarchy = 'pub_date'
- ModelAdmin.actionsLink to this definition
チェンジリストページで有効化するアクションのリストです。詳細は Admin actions を参照してください。
- ModelAdmin.actions_on_topLink to this definition
- ModelAdmin.actions_on_bottomLink to this definition
ページ上のどこにアクションバーが表示されかをコントロールします。デフォルトでは、admin チェンジリストはページのトップにアクションを表示します (
actions_on_top = True; actions_on_bottom = False)。
- ModelAdmin.actions_selection_counterLink to this definition
アクションのドロップダウンの隣に選択用カウンターを表示するかどうかをコントロールします。デフォルトでは、admin チェンジリストは表示するようになっています (
actions_selection_counter = True)。
- ModelAdmin.date_hierarchyLink to this definition
date_hierarchyをモデル内のDateFieldかDateTimeFieldの名前にセットすると、チェンジリストのページがそのフィールドによる日付ベースのドリルダウンナビゲーションを含むようになります。実装例:
date_hierarchy = 'pub_date'__ルックアップを使用して、関連するモデルのフィールドを指定することもできます。たとえば:date_hierarchy = 'author__pub_date'この機能は、有効なデータに基づいて、適切に変化させます。たとえば、すべての日付が 1 月に収まっている場合、日のドリルダウンのみを表示します。
- ModelAdmin.empty_value_displayLink to this definition
この属性は、空(
None、空の文字列、等)のレコードのフィールドに対するデフォルトの表示値をオーバーライドします。デフォルト値は-(ダッシュ)です。たとえば:from django.contrib import admin class AuthorAdmin(admin.ModelAdmin): empty_value_display = '-empty-'AdminSite.empty_value_displayですべての admin ページもしくは特定のフィールドに対してempty_value_displayをオーバーライドすることもできます:from django.contrib import admin class AuthorAdmin(admin.ModelAdmin): fields = ('name', 'title', 'view_birth_date') @admin.display(empty_value='???') def view_birth_date(self, obj): return obj.birth_date
- ModelAdmin.excludeLink to this definition
この属性を使用する場合、フォームから除外するフィールドの名称をリストで指定します。
たとえば、以下のモデルを考えてみましょう:
from django.db import models class Author(models.Model): name = models.CharField(max_length=100) title = models.CharField(max_length=3) birth_date = models.DateField(blank=True, null=True)Authorモデルに対するフォームがnameとtitleの 2 つのフィールドのみを含むようにしたい場合、以下のようにfieldsかexcludeを指定することになります:from django.contrib import admin class AuthorAdmin(admin.ModelAdmin): fields = ('name', 'title') class AuthorAdmin(admin.ModelAdmin): exclude = ('birth_date',)Author モデルが 3 つのフィールド (
name、title、birth_date) しか持っていないので、上記の宣言によって生成されるフォームはまったく同じフィールドを持つことになります。
- ModelAdmin.fieldsLink to this definition
"add" と "change" 上のフォームでシンプルなレイアウト変更 (有効なフィールドのみを表示する、順序を変える、行にグルーピングする、等) を行うには、
fieldsオプションを使用してください。たとえば、django.contrib.flatpages.models.FlatPageモデルに対して admin フォームのよりシンプルなバージョンを定義することができます:class FlatPageAdmin(admin.ModelAdmin): fields = ('url', 'title', 'content')上記の例では、指定したフィールド (
url、title、content) だけが (結果として) フォーム上で表示されます。fieldsはModelAdmin.readonly_fieldsで定義される値を持つことができ、読み込み専用で表示されます。より複雑なレイアウトを作るには、the
fieldsetsオプションを参照してください。fieldsオプションは、list_displayと同じタイプの値を受け付けますが、呼び出し可能オブジェクトを受け付けないところが異なります。readonly_fieldsにリスト化されている場合、モデルの名前とモデルの admin メソッドのみが使用されます。1 つの行に複数のフィールドを表示するには、タプルで囲んでください。この例では、
urlとtitleフィールドが同じ行に表示され、contentフィールドは次の行に表示されます:class FlatPageAdmin(admin.ModelAdmin): fields = (('url', 'title'), 'content')fieldsとfieldsetsオプションのどちらも存在しない場合、Django はデフォルトでAutoFieldとeditable=True以外の各フィールドを、単一のフィールドセットで、モデル内でフィールドが定義されたとおりの順番で表示します。
- ModelAdmin.fieldsetsLink to this definition
admin の "add" と "change" ページのレイアウトをコントロールするには、
fieldsetsをセットしてください。fieldsetsは、2 タプルのリストで、各 2 タプルは admin フォームページの<fieldset>を表します。 (<fieldset>はフォームの "section" です。)2 タプルのフォーマットは
(name, field_options)で、nameはフィールドセットのタイトル文字列を表し、field_optionsフィールドセットに関する情報のディクショナリで、表示するフィールドのリストを含みます。django.contrib.flatpages.models.FlatPageモデルを用いた例は以下のようになります:from django.contrib import admin class FlatPageAdmin(admin.ModelAdmin): fieldsets = ( (None, { 'fields': ('url', 'title', 'content', 'sites') }), ('Advanced options', { 'classes': ('collapse',), 'fields': ('registration_required', 'template_name'), }), )これにより、admin ページは以下のような見た目となります:
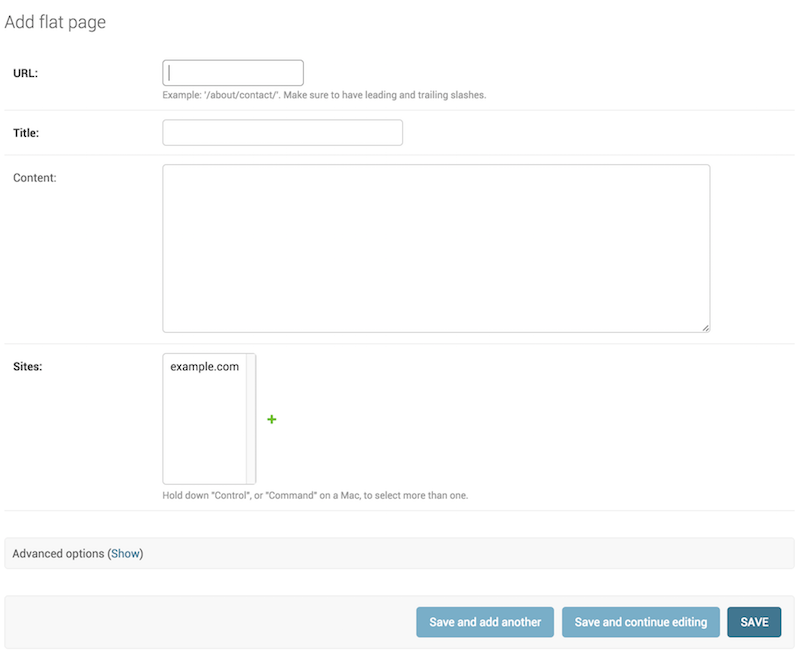
fieldsetsとfieldsオプションのどちらも存在しない場合、Django はデフォルトでAutoFieldとeditable=True以外の各フィールドを、単一のフィールドセットで、モデル内でフィールドが定義されたとおりの順番で表示します。field_optionsディクショナリは以下のキーを持つことができます:fieldsフィールドセット内に表示するフィールド名のタプルです。このキーは必須です。
実装例:
{ 'fields': ('first_name', 'last_name', 'address', 'city', 'state'), }fieldsオプションと同様に、複数のフィールドを 1 行に表示するにはタプルでこれらのフィールドを囲んでください。この例では、first_nameとlast_nameフィールドが 1 つの行に表示されます:{ 'fields': (('first_name', 'last_name'), 'address', 'city', 'state'), }fieldsはModelAdmin.readonly_fieldsで定義される値を持つことができ、読み込み専用で表示されます。fieldsに呼び出し可能オブジェクトの名前を追加した場合、fieldsオプションと同じルールが適用されます: 呼び出し可能オブジェクトはreadonly_fields内でリスト化される必要があります。
classesフィールドセットに適用する追加的な CSS を含むリストないしタプルです。
実装例:
{ 'classes': ('wide', 'extrapretty'), }collapseと``wide``の 2 つの便利なクラスがデフォルトの admin サイトのスタイルシートで定義されています。collapseスタイルのフィールドセットは初期状態では admin 内で折りたたまれており、"click to expand" リンクで置き換えられています。wideスタイルのフィールドセットは水平方向の追加的な余白が与えられます。
descriptionA string of optional extra text to be displayed at the top of each fieldset, under the heading of the fieldset. This string is not rendered for
TabularInlinedue to its layout.Note that this value is not HTML-escaped when it's displayed in the admin interface. This lets you include HTML if you so desire. Alternatively you can use plain text and
django.utils.html.escape()to escape any HTML special characters.
- ModelAdmin.filter_horizontalLink to this definition
デフォルトでは、
ManyToManyFieldは<select multiple>で admin サイトで表示されます。複数選択のボックスは、たくさんのアイテムを選択するには不向きです。ManyToManyFieldをこのリストに加えると、代わりにかっこよくて控えめな JavaScript の "filter" インターフェースを使用します。非選択および選択済みのオプションは 2 つのボックスに並べて表示されます。垂直方向のインターフェースを使用するにはfilter_verticalを参照してください。
- ModelAdmin.filter_verticalLink to this definition
filter_horizontalと同じですが、フィルタインターフェイスを垂直方向に表示し、非選択のオプションは選択済みのオプションの上部に表示されます。
- ModelAdmin.formLink to this definition
デフォルトではモデルに対して
ModelFormが動的に生成されます。追加と変更の両方のページで使用されるフォームです。独自のModelFormを定義すれば、追加と変更のページでフォームの挙動を簡単にオーバーライドできます。あるいは、まったく新しいモデルフォームを作る代わりに、ModelAdmin.get_form()メソッドを使ってデフォルトのフォームをカスタムすることもできます。例については カスタムのバリデーションを admin に追加する を参照してください。
- ModelAdmin.formfield_overridesLink to this definition
admin 内で使用するための
Fieldのうちある程度の部分をオーバーライドする簡単 (だけど汚い) 方法を提供します。formfield_overridesはディクショナリで、フィールドクラスの構成時にフィールドに渡す引数のディクショナリをマッピングします。これでは抽象的すぎるので、具体的な例を見てみましょう。
formfield_overridesのもっとも一般的な使い道は、特定のタイプのフィールドに対してカスタムしたウィジェットを追加することです。大きなテキストフィールドを使用するために、デフォルトの<textarea>の代わりにRichTextEditorWidgetを使いたいとしましょう。この場合、以下のように記述します:from django.contrib import admin from django.db import models # Import our custom widget and our model from where they're defined from myapp.models import MyModel from myapp.widgets import RichTextEditorWidget class MyModelAdmin(admin.ModelAdmin): formfield_overrides = { models.TextField: {'widget': RichTextEditorWidget}, }ディクショナリ内のキーは文字列 ではなく 実際のフィールドクラスである点に注意してください。値は別のディクショナリです; これらの引数はフォームフィールドの
__init__()メソッドに渡されます。詳細は フォーム API を参照してください。
- ModelAdmin.inlinesLink to this definition
後述の
InlineModelAdminオブジェクトとModelAdmin.get_formsets_with_inlines()を参照してください。
- ModelAdmin.list_displayLink to this definition
admin のチェンジリストページでどのフィールドを表示するかコントロールするために、
list_displayをセットします。実装例:
list_display = ('first_name', 'last_name')list_displayをセットしない場合、admin サイトは各オブジェクトの__str__()表現を表示する単一の列を表示します。There are four types of values that can be used in
list_display. All but the simplest may use thedisplay()decorator is used to customize how the field is presented:モデルフィールドの名前。たとえば:
class PersonAdmin(admin.ModelAdmin):
    list_display = ('first_name', 'last_name')
1 つの引数 (モデルのインスタンス) を受け入れる呼び出し可能オブジェクトです。たとえば:
@admin.display(description='Name')
def upper_case_name(obj):
    return ("%s %s" % (obj.first_name, obj.last_name)).upper()

class PersonAdmin(admin.ModelAdmin):
    list_display = (upper_case_name,)
1 つの引数 (モデルのインスタンス) を受け入れる
ModelAdminメソッドを表す文字列です。たとえば:class PersonAdmin(admin.ModelAdmin): list_display = ('upper_case_name',) @admin.display(description='Name') def upper_case_name(self, obj): return ("%s %s" % (obj.first_name, obj.last_name)).upper()モデルの属性や (必須の引数を持たない) メソッドを表す文字列です。たとえば:
from django.contrib import admin
from django.db import models

class Person(models.Model):
    name = models.CharField(max_length=50)
    birthday = models.DateField()

    @admin.display(description='Birth decade')
    def decade_born_in(self):
        return '%d’s' % (self.birthday.year // 10 * 10)

class PersonAdmin(admin.ModelAdmin):
    list_display = ('name', 'decade_born_in')
list_displayに関する特殊な状況の注意点です:フィールドが
ForeignKeyの場合、 Django は関係オブジェクトの__str__()を表示します。ManyToManyFieldフィールドは、テーブル内で各行に対して個別の SQL ステートメントを実行する可能性があるため、サポートされていません。それでも使いたい場合は、モデルにカスタムメソッドを作成し、そのメソッドの名前をlist_displayに追加してください。 (list_display内でのカスタムメソッドについてより詳しくは下記を参照してください。)If the field is a
BooleanField, Django will display a pretty "yes", "no", or "unknown" icon instead ofTrue,False, orNone.与えられた文字列がモデル、
ModelAdmin、呼び出し可能オブジェクトのどれかの場合、Django はデフォルトで HTML エスケープして出力します。ユーザーの入力をエスケープしたり非エスケープのタグを使う場合、format_html()を使用してください。以下は、モデルの例です:
from django.contrib import admin
from django.db import models
from django.utils.html import format_html

class Person(models.Model):
    first_name = models.CharField(max_length=50)
    last_name = models.CharField(max_length=50)
    color_code = models.CharField(max_length=6)

    @admin.display
    def colored_name(self):
        return format_html(
            '<span style="color: #{};">{} {}</span>',
            self.color_code,
            self.first_name,
            self.last_name,
        )

class PersonAdmin(admin.ModelAdmin):
    list_display = ('first_name', 'last_name', 'colored_name')
As some examples have already demonstrated, when using a callable, a model method, or a
ModelAdminmethod, you can customize the column's title by wrapping the callable with thedisplay()decorator and passing thedescriptionargument.フィールドの値が
None、空の文字列、エレメントを持たない iterable のいずれかの場合、Django は-(ダッシュ) を表示します。この挙動はAdminSite.empty_value_displayでオーバーライドできます:from django.contrib import admin admin.site.empty_value_display = '(None)'ModelAdmin.empty_value_displayも使用できます:class PersonAdmin(admin.ModelAdmin): empty_value_display = 'unknown'もしくは、フィールドレベルで以下のようにできます:
class PersonAdmin(admin.ModelAdmin): list_display = ('name', 'birth_date_view') @admin.display(empty_value='unknown') def birth_date_view(self, obj): return obj.birth_dateIf the string given is a method of the model,
ModelAdminor a callable that returnsTrue,False, orNone, Django will display a pretty "yes", "no", or "unknown" icon if you wrap the method with thedisplay()decorator passing thebooleanargument with the value set toTrue:from django.contrib import admin from django.db import models class Person(models.Model): first_name = models.CharField(max_length=50) birthday = models.DateField() @admin.display(boolean=True) def born_in_fifties(self): return 1950 <= self.birthday.year < 1960 class PersonAdmin(admin.ModelAdmin): list_display = ('name', 'born_in_fifties')__str__()メソッドは、他のモデルメソッドとまったく同様にlist_display内でも有効です。つまり、以下のような書き方は完璧に OK です:list_display = ('__str__', 'some_other_field')通常、実際のデータベースフィールドではない
list_displayの要素は、ソートに使用できません (Django のソートはすべてデータベースレベルで実行されるためです)。However, if an element of
list_displayrepresents a certain database field, you can indicate this fact by using thedisplay()decorator on the method, passing theorderingargument:from django.contrib import admin from django.db import models from django.utils.html import format_html class Person(models.Model): first_name = models.CharField(max_length=50) color_code = models.CharField(max_length=6) @admin.display(ordering='first_name') def colored_first_name(self): return format_html( '<span style="color: #{};">{}</span>', self.color_code, self.first_name, ) class PersonAdmin(admin.ModelAdmin): list_display = ('first_name', 'colored_first_name')上記のコードは、admin 内で
colored_first_nameで ソートしようとするとき、first_nameフィールドで並べ替えるよう Django に伝えます。To indicate descending order with the
orderingargument you can use a hyphen prefix on the field name. Using the above example, this would look like:@admin.display(ordering='-first_name')The
orderingargument supports query lookups to sort by values on related models. This example includes an "author first name" column in the list display and allows sorting it by first name:class Blog(models.Model): title = models.CharField(max_length=255) author = models.ForeignKey(Person, on_delete=models.CASCADE) class BlogAdmin(admin.ModelAdmin): list_display = ('title', 'author', 'author_first_name') @admin.display(ordering='author__first_name') def author_first_name(self, obj): return obj.author.first_nameQuery expressions may be used with the
orderingargument:from django.db.models import Value from django.db.models.functions import Concat class Person(models.Model): first_name = models.CharField(max_length=50) last_name = models.CharField(max_length=50) @admin.display(ordering=Concat('first_name', Value(' '), 'last_name')) def full_name(self): return self.first_name + ' ' + self.last_nameElements of
list_displaycan also be properties:class Person(models.Model): first_name = models.CharField(max_length=50) last_name = models.CharField(max_length=50) @property @admin.display( ordering='last_name', description='Full name of the person', ) def full_name(self): return self.first_name + ' ' + self.last_name class PersonAdmin(admin.ModelAdmin): list_display = ('full_name',)Note that
@propertymust be above@display. If you're using the old way -- setting the display-related attributes directly rather than using thedisplay()decorator -- be aware that theproperty()function and not the@propertydecorator must be used:def my_property(self): return self.first_name + ' ' + self.last_name my_property.short_description = "Full name of the person" my_property.admin_order_field = 'last_name' full_name = property(my_property)The field names in
list_displaywill also appear as CSS classes in the HTML output, in the form ofcolumn-<field_name>on each<th>element. This can be used to set column widths in a CSS file for example.Django は、
list_displayの各要素を以下の順番で解釈しようとします:モデルのフィールド。
呼び出し可能オブジェクト。
ModelAdmin属性を表す文字列。モデル属性を表す文字列。
たとえば、
first_nameがモデルフィールドとModelAdmin属性の両方で存在する場合、モデルフィールドの方が使用されます。
- ModelAdmin.list_display_linksLink to this definition
list_display内のフィールドにおいて "変更" ページへのリンクをコントロールするには、list_display_linksを使用してください。デフォルトでは、チェンジリストページは最初のカラム --
list_displayで最初に指定したフィールドです -- に各アイテムの変更ページへのリンクが貼られています。しかし、list_display_linksを使って変更できます:リンクを貼らない場合は
Noneをセットしてください。(
list_displayと同様のフォーマットで) リンクに変換したいカラムのフィールドのリストないしタプルをセットしてください。1 つないし複数のフィールドを指定できます。
list_displayにある限り、Django はいくつのフィールドがリンクになろうと気にしません。唯一の要件は、list_display_linksをこの方式で使いたいときはlist_displayを指定することです。
以下の例では、
first_nameとlast_nameフィールドがチェンジリストページでリンクされます:class PersonAdmin(admin.ModelAdmin): list_display = ('first_name', 'last_name', 'birthday') list_display_links = ('first_name', 'last_name')以下の例では、チェンジリストページのグリッドにはリンクがなくなります:
class AuditEntryAdmin(admin.ModelAdmin):
    list_display = ('timestamp', 'message')
    list_display_links = None
- ModelAdmin.list_editableLink to this definition
チェンジリストページ上での編集を有効にしたいモデルのフィールド名のリストを
list_editableにセットしてください。list_editableに指定されたフィールドは、チェンジリストページ上でフォームウィジェットとして表示され、ユーザーは複数の行を一度に編集して保存することができます。
- ModelAdmin.list_filterLink to this definition
admin のチェンジリストページの右サイドバーのフィルタ (以下のような見た目です) を有効化するには、
list_filterをセットしてください。: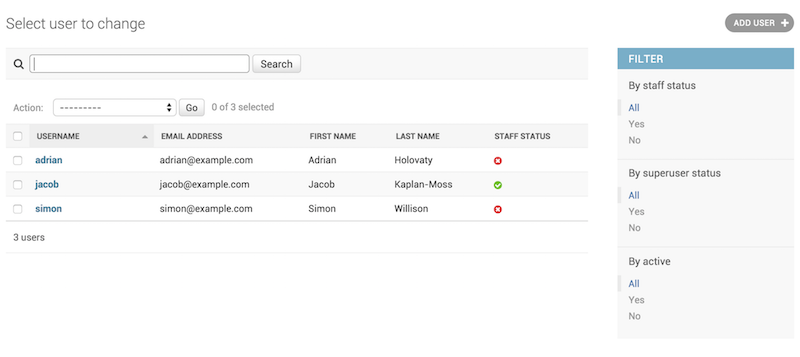
list_filterは要素のリストかタプルで、各要素は以下のいずれかの種類となります:フィールドの名称で、フィールドには
BooleanField、CharField、DateField、DateTimeField、IntegerField、ForeignKey、ManyToManyFieldのどれかを指定します。たとえば:class PersonAdmin(admin.ModelAdmin): list_filter = ('is_staff', 'company')list_filter内のフィールド名は``__`` ルックアップを使って関係先を参照できます。たとえば:class PersonAdmin(admin.UserAdmin): list_filter = ('company__name',)django.contrib.admin.SimpleListFilterを継承したクラスで、title` とparameter_name属性を指定し、またlookupsとquerysetメソッドをオーバーライドする必要があります。たとえば:from datetime import date from django.contrib import admin from django.utils.translation import gettext_lazy as _ class DecadeBornListFilter(admin.SimpleListFilter): # Human-readable title which will be displayed in the # right admin sidebar just above the filter options. title = _('decade born') # Parameter for the filter that will be used in the URL query. parameter_name = 'decade' def lookups(self, request, model_admin): """ Returns a list of tuples. The first element in each tuple is the coded value for the option that will appear in the URL query. The second element is the human-readable name for the option that will appear in the right sidebar. """ return ( ('80s', _('in the eighties')), ('90s', _('in the nineties')), ) def queryset(self, request, queryset): """ Returns the filtered queryset based on the value provided in the query string and retrievable via `self.value()`. """ # Compare the requested value (either '80s' or '90s') # to decide how to filter the queryset. if self.value() == '80s': return queryset.filter(birthday__gte=date(1980, 1, 1), birthday__lte=date(1989, 12, 31)) if self.value() == '90s': return queryset.filter(birthday__gte=date(1990, 1, 1), birthday__lte=date(1999, 12, 31)) class PersonAdmin(admin.ModelAdmin): list_filter = (DecadeBornListFilter,)タプルで、最初の要素がフィールド名で、2 番目の要素が
django.contrib.admin.FieldListFilterを継承したクラスです。たとえば:class PersonAdmin(admin.ModelAdmin): list_filter = ( ('is_staff', admin.BooleanFieldListFilter), )RelatedOnlyFieldListFilterを使って、関係内に含まれたオブジェクトへの関係モデルの選択肢を制限することができます:class BookAdmin(admin.ModelAdmin): list_filter = ( ('author', admin.RelatedOnlyFieldListFilter), )authorがUserモデルへのForeignKeyと仮定すると、list_filterの選択肢が全ユーザーではなく book を書いたことがあるユーザーだけに絞られます。You can filter empty values using
EmptyFieldListFilter, which can filter on both empty strings and nulls, depending on what the field allows to store:class BookAdmin(admin.ModelAdmin): list_filter = ( ('title', admin.EmptyFieldListFilter), )
List filter's typically appear only if the filter has more than one choice. A filter's
has_output()method controls whether or not it appears.It is possible to specify a custom template for rendering a list filter:
class FilterWithCustomTemplate(admin.SimpleListFilter):
    template = "custom_template.html"
具体的な例については、Django により提供されるデフォルトのテンプレート (
admin/filter.html) を参照してください。
- ModelAdmin.list_max_show_allLink to this definition
"Show all" の admin チェンジリストページで表示するアイテム数をコントロールするには、
list_max_show_allをセットしてください。チェンジリストページの "Show all" リンクは、この設定値以下の場合のみ表示されます。デフォルトでは``200`` にセットされています。
- ModelAdmin.list_per_pageLink to this definition
ページづけられた admin のチェンジリストページに表示するアイテム数をコントロールするには、
list_per_pageをセットしてください。デフォルトでは100にセットされています。
admin のチェンジリストページでオブジェクトのリストを検索するときに
select_related()を使用するよう Django に伝えるには、list_select_relatedをセットしてください。これにより多くのデータベースクエリを削減できます。値は真偽値、リスト、タプルのどれかである必要があります。デフォルトは
Falseです。値が
Trueのとき、常にselect_related()が呼ばれます。Falseのときは、ForeignKeyが存在する場合 Django はlist_displayを参照してselect_related()を呼び出します。よりきめ細やかにコントロールする場合は、
list_select_relatedの値にタプル (ないしリスト) を使用してください。空のタプルは、Django がselect_relatedを一切呼び出さないようにします。他のタプルは、パラメータとして直接select_relatedに渡されます。例えば:class ArticleAdmin(admin.ModelAdmin): list_select_related = ('author', 'category')これは
select_related('author', 'category')を呼び出します。リクエストに基づいた動的な値を指定する場合は、
get_list_select_related()メソッドを実装できます。
- ModelAdmin.orderingLink to this definition
Django の admin ビューでオブジェクトのリストをどのように並べるかを指定するには、
orderingをセットしてください。モデルのorderingパラメータと同じフォーマットでリストかタプルを与えてください。指定がない場合、Django admin はモデルのデフォルトの並び順を使用します。
動的な並び順を指定する場合 (例えばユーザーや言語に応じる場合など)、
get_ordering()メソッドを実装できます。
- ModelAdmin.paginatorLink to this definition
ページづけに使われる paginator クラスです。デフォルトでは
django.core.paginator.Paginatorが使われます。カスタムの paginator クラスがdjango.core.paginator.Paginatorと同じコンストラクタインターフェースを持たない場合、ModelAdmin.get_paginator()に対する実装も行う必要があります。
- ModelAdmin.prepopulated_fieldsLink to this definition
Set
prepopulated_fieldsto a dictionary mapping field names to the fields it should prepopulate from:class ArticleAdmin(admin.ModelAdmin): prepopulated_fields = {"slug": ("title",)}When set, the given fields will use a bit of JavaScript to populate from the fields assigned. The main use for this functionality is to automatically generate the value for
SlugFieldfields from one or more other fields. The generated value is produced by concatenating the values of the source fields, and then by transforming that result into a valid slug (e.g. substituting dashes for spaces and lowercasing ASCII letters).Prepopulated fields aren't modified by JavaScript after a value has been saved. It's usually undesired that slugs change (which would cause an object's URL to change if the slug is used in it).
prepopulated_fieldsはDateTimeField、ForeignKey、OneToOneField、ManyToManyFieldフィールドを受け入れません。
- ModelAdmin.preserve_filtersLink to this definition
By default, applied filters are preserved on the list view after creating, editing, or deleting an object. You can have filters cleared by setting this attribute to
False.
- ModelAdmin.radio_fieldsLink to this definition
デフォルトでは、
ForeignKeyやchoicesがセットされたフィールドに対して、Django の admin はセレクトボックスのインターフェース (<select>) を使用します。フィールドがradio_fieldsに指定された場合、Django は代わりに ラジオボタンのインターフェースを使用します。groupがPersonモデルのForeignKeyだと仮定すると:class PersonAdmin(admin.ModelAdmin): radio_fields = {"group": admin.VERTICAL}django.contrib.adminモジュールからHORIZONTALかVERTICALのどちらを使用するか選択してください。ForeignKeyないしchoicesがセットされたフィールド以外は、radio_fieldsに含めないでください。
- ModelAdmin.autocomplete_fieldsLink to this definition
autocomplete_fieldsは、Select2 オートコンプリート入力に変更したいForeignKeyないしManyToManyFieldフィールドのリストです。デフォルトでは、これらのフィールドに対して admin はセレクトボックスのインターフェース (
<select>) を使用します。ドロップダウン内に表示する関係インスタンスをすべて選択するオーバーヘッドから逃れたいこともあるでしょう。Select2 入力はデフォルトの入力と似た見た目ですが、非同期的にオプションを読み込む検索機能を持っています。こちらの方が高速で、特に関係モデルに多くのインスタンスがある場合にはユーザーフレンドリーです。
オートコンプリート検索は関係オブジェクトの
ModelAdminを使用するため、ModelAdminにsearch_fieldsを定義する必要があります。認証されていないデータが表示されるのを防ぐため、オートコンプリートを使うには、ユーザーは関係オブジェクトに対する
viewかchange権限を持っている必要があります。結果の並べ替えおよびページづけは、関係する
ModelAdminのget_ordering()とget_paginator()メソッドでコントロールします。以下の例では、
ChoiceAdminフィールドはQuestionへのForeignKeyに対するオートコンプリートフィールドを持ちます。結果はquestion_textフィールドによりフィルタされ、また``date_created`` フィールドにより並べ替えられます:class QuestionAdmin(admin.ModelAdmin): ordering = ['date_created'] search_fields = ['question_text'] class ChoiceAdmin(admin.ModelAdmin): autocomplete_fields = ['question']
- ModelAdmin.raw_id_fieldsLink to this definition
デフォルトでは、
ForeignKeyのフィールドに対して Django の admin はセレクトボックスのインターフェース (<select>) を使用します。ドロップダウン内に表示する関係インスタンスをすべて選択するオーバーヘッドから逃れたいこともあるでしょう。raw_id_fieldsは、ForeignKeyやManyToManyFieldに対するInputウィジェットを適用したいフィールドのリストです:class ArticleAdmin(admin.ModelAdmin): raw_id_fields = ("newspaper",)raw_id_fieldsInputウィジェットには、ForeignKeyの場合はプライマリキーを、ManyToManyFieldの場合はカンマで区切った値のリストを入力します。raw_id_fieldsウィジェットには、ユーザーが値を検索および選択できるよう、隣にルーペボタンがあります:
- ModelAdmin.readonly_fieldsLink to this definition
デフォルトでは、すべてのフィールドが編集可能となっています。このオプションに含まれるフィールド (
listかtupleで指定します) は、データをそのまま表示するだけで編集できなくなります; また、追加と編集に使われるModelFormからも除外されます。ModelAdmin.fieldsかModelAdmin.fieldsetsを指定した場合、read-only のフィールドは表示のために存在している必要があります (存在しなければ無視されます)。ModelAdmin.fieldsやModelAdmin.fieldsetsで明示的に並び順を定義しないでreadonly_fieldsを使った場合、これらのフィールドはすべての編集可能なフィールドの後に表示されます。A read-only field can not only display data from a model's field, it can also display the output of a model's method or a method of the
ModelAdminclass itself. This is very similar to the wayModelAdmin.list_displaybehaves. This provides a way to use the admin interface to provide feedback on the status of the objects being edited, for example:from django.contrib import admin from django.utils.html import format_html_join from django.utils.safestring import mark_safe class PersonAdmin(admin.ModelAdmin): readonly_fields = ('address_report',) # description functions like a model field's verbose_name @admin.display(description='Address') def address_report(self, instance): # assuming get_full_address() returns a list of strings # for each line of the address and you want to separate each # line by a linebreak return format_html_join( mark_safe('<br>'), '{}', ((line,) for line in instance.get_full_address()), ) or mark_safe("<span class='errors'>I can't determine this address.</span>")
- ModelAdmin.save_asLink to this definition
admin のチェンジーフォームで "新規に保存" 機能を有効化するには
save_asをセットしてください。通常、オブジェクトには 3 つの保存オプションがあります: "保存"、"保存して編集を続ける"、"保存して 1 つ追加" です。
save_asがTrueの場合、"保存して 1 つ追加" が "新規に保存" ボタンに変更され、既存のオブジェクトを変更するのではなく (新しい ID) で新規のオブジェクトが作成されるようになります。デフォルトでは
save_asはFalseにセットされています。
- ModelAdmin.save_as_continueLink to this definition
save_as=Trueのとき、新規オブジェクトを保存した後のデフォルトのリダイレクト先はそのオブジェクトの変更ビューです。save_as_continue=Falseにセットすると、リダイレクト先がチェンジリストビューになります。デフォルトでは
save_as_continueはTrueにセットされています。
- ModelAdmin.save_on_topLink to this definition
admin のチェンジフォームの上部に保存ボタンを追加するには
save_on_topをセットしてください。通常、保存ボタンはフォームの下部のみに表示されます。
save_on_topをセットすると、ボタンは上部と下部の両方に表示されるようになります。デフォルトでは
save_on_topはFalseにセットされています。
- ModelAdmin.search_fieldsLink to this definition
admin のチェンジリストページで検索ボックスを有効化するには
search_fieldsをセットしてください。セットするのはフィールド名のリストで、ここで指定したフィールドはテキストボックス内での検索クエリの対象となります。指定するフィールドの種類は、
CharFieldやTextFieldといったテキストフィールドである必要があります。検索 API の "follow" 記法を使えばForeignKeyやManyToManyFieldを検索することもできます:search_fields = ['foreign_key__related_fieldname']例えば、著者の情報を持つブログエントリーの場合、以下の定義により、著者の E メールアドレスによるブログエントリーの検索が可能となります:
search_fields = ['user__email']検索ボックスで検索が行われるとき、Django は検索クエリを単語に分割し、(
icontains検索を使って) 大文字と小文字を区別しない各単語を含むオブジェクトを返します。各単語は最低 1 つのsearch_fieldsに含まれている必要があります。例えば、search_fieldsが['first_name', 'last_name']にセットされ、ユーザーがjohn lennonと検索した場合、Django は SQL のWHERE節と同等の検索を実行します:WHERE (first_name ILIKE '%john%' OR last_name ILIKE '%john%') AND (first_name ILIKE '%lennon%' OR last_name ILIKE '%lennon%')The search query can contain quoted phrases with spaces. For example, if a user searches for
"john winston"or'john winston', Django will do the equivalent of this SQLWHEREclause:WHERE (first_name ILIKE '%john winston%' OR last_name ILIKE '%john winston%')検索に
icontainsを使いたくない場合、フィールドに検索方法を追加することで、好きな方法を使うことができます。例えば、search_fieldsに['first_name__exact']をセットすればexactを使えます。いくつかの (古い) ショートカットを使って、フィールドの検索方法を指定することもできます。以下の文字で
search_fields内のフィールドにプレフィックスを追加できます。これはフィールドに__<lookup>を追加するのと同等です:プレフィックス
検索方法
^
=
@
None
検索方法をカスタムする必要がある場合は、
ModelAdmin.get_search_results()を使って追加的もしくは代替の検索方法を提供することができます。
- ModelAdmin.show_full_result_countLink to this definition
フィルタリングされた admin ページにオブジェクトのカウント (例:
99 results (103 total)) を表示するかどうかをコントロールするには、show_full_result_countをセットしてください。Falseにセットすると、代わりに99 results (Show all)のような文字列が表示されるようになります。デフォルトの
show_full_result_count=Trueは、テーブル内の全アイテムをカウントするクエリを発行するため、多くの行を含むテーブルではパフォーマンス低下の原因となります。
- ModelAdmin.sortable_byLink to this definition
By default, the change list page allows sorting by all model fields (and callables that use the
orderingargument to thedisplay()decorator or have theadmin_order_fieldattribute) specified inlist_display.特定のカラムでの並び替えを無効化したい場合、
sortable_byにlist_displayサブセットのコレクション (例:list、tuple、set) をセットしてください。空のコレクションを指定すると、すべてのカラムで並び替え不可となります。リストを動的に指定する必要があるときは、代わりに
get_sortable_by()メソッドを実装してください。
- ModelAdmin.view_on_siteLink to this definition
"サイトで見る" リンクを表示するか否かをコントロールするには、
view_on_siteをセットしてください。このリンクは保存されたオブジェクトを表示できる URL に誘導します。値は、真偽値か呼び出し可能オブジェクトで指定します。
True(デフォルトです) の場合、オブジェクトのget_absolute_url()メソッドが使われ、URLが生成されます。モデルが
get_absolute_url()メソッドを持っていても "サイトで見る" ボタンを表示したくない場合は、view_on_siteにFalseをセットしてください:from django.contrib import admin class PersonAdmin(admin.ModelAdmin): view_on_site = False呼び出し可能オブジェクトの場合、引数にモデルのインスタンスを受け入れます。例えば:
from django.contrib import admin
from django.urls import reverse

class PersonAdmin(admin.ModelAdmin):
    def view_on_site(self, obj):
        url = reverse('person-detail', kwargs={'slug': obj.slug})
        return 'https://example.com' + url
カスタムテンプレートのオプションLink to this heading
Overriding admin templates セクションでは、デフォルトの admin テンプレートをオーバーライドないし拡張する方法を説明しています。ModelAdmin ビューで使用されるデフォルトのテンプレートをオーバーライドするには、以下のオプションを使用してください:
- ModelAdmin.add_form_templateLink to this definition
カスタムンテンプレートの絶対パスで、
add_view()で使われます。
- ModelAdmin.change_form_templateLink to this definition
カスタムンテンプレートの絶対パスで、
change_view()で使われます。
- ModelAdmin.change_list_templateLink to this definition
カスタムンテンプレートの絶対パスで、
changelist_view()で使われます。
- ModelAdmin.delete_confirmation_templateLink to this definition
カスタムンテンプレートの絶対パスで、1 つ以上のオブジェクトを削除するときに確認ページを表示するために、
delete_view()で使われます。
- ModelAdmin.delete_selected_confirmation_templateLink to this definition
カスタムンテンプレートの絶対パスで、1 つ以上のオブジェクトを削除するときに確認ページを表示するために、
delete_selectedアクションメソッドで使われます。actions documentation を参照してください。
- ModelAdmin.object_history_templateLink to this definition
カスタムンテンプレートの絶対パスで、
history_view()で使われます。
- ModelAdmin.popup_response_templateLink to this definition
カスタムンテンプレートの絶対パスで、
response_add()、response_change()、response_delete()の 3 つで使われます。
ModelAdmin のメソッドLink to this heading
- ModelAdmin.save_model(request, obj, form, change)Link to this definition
save_modelメソッドには、HttpRequest、モデルのインスタンス、ModelFormのインスタンス、追加か変更かを表す真偽値が渡されます。このメソッドをオーバーライドすると、保存の前後に操作を追加できます。super().save_model()を呼び出して、Model.save()を使ってオブジェクトを保存してください。例えば、保存前にオブジェクトに
request.userを追加するには:from django.contrib import admin class ArticleAdmin(admin.ModelAdmin): def save_model(self, request, obj, form, change): obj.user = request.user super().save_model(request, obj, form, change)
- ModelAdmin.delete_model(request, obj)Link to this definition
delete_modelには、HttpRequestとモデルのインスタンスが渡されます。このメソッドをオーバーライドすると、削除の前後に操作を追加できます。super().delete_model()を呼び出して、Model.delete()を使ってオブジェクトを削除してください。
- ModelAdmin.delete_queryset(request, queryset)Link to this definition
delete_queryset()には、HttpRequestと削除するオブジェクトのQuerySetが渡されます。このメソッドをオーバーライドすると、"選択したオブジェクトの削除" アクション に対する削除のプロセスをカスタムできます。
- ModelAdmin.save_formset(request, form, formset, change)Link to this definition
save_formsetメソッドには、HttpRequest、親ModelFormのインスタンス、親オブジェクトの追加か変更かを表す真偽値が与えられます。例えば、変更のあったフォームセットのモデルのインスタンスそれぞれに
request.userを追加するには:class ArticleAdmin(admin.ModelAdmin): def save_formset(self, request, form, formset, change): instances = formset.save(commit=False) for obj in formset.deleted_objects: obj.delete() for instance in instances: instance.user = request.user instance.save() formset.save_m2m()Saving objects in the formset もご覧ください。
- ModelAdmin.get_ordering(request)Link to this definition
get_orderingメソッドは引数にrequestを取り、orderingのときと同じようなlistかtupleを返すことが期待されます。例えば:class PersonAdmin(admin.ModelAdmin): def get_ordering(self, request): if request.user.is_superuser: return ['name', 'rank'] else: return ['name']
- ModelAdmin.get_search_results(request, queryset, search_term)Link to this definition
get_search_resultsメソッドは、検索語と一致するオブジェクトを表示するための、オブジェクトのリストを修正します。リクエスト、現在のフィルタを適用するクエリセット、 ユーザーが入力した検索語を受け取ります。 検索を実行するために修正されたクエリセットと、結果に重複があるかどうかを表す真偽値を含むタプルを返します。デフォルトの実装では、
ModelAdmin.search_fieldsに含まれるフィールドを検索します。このメソッドは、独自の検索方法でオーバーライドすることができます。例えば、数値のフィールドで検索したり、Solr や Haystack といった外部のツールを使うことができます。独自の検索方法によって実装されたクエリセットの変更が結果に重複を生じさせるかを確認し、返値の 2 番目の要素に
Trueを返す必要があります。例えば、
nameとageで検索するには、以下のように使います:class PersonAdmin(admin.ModelAdmin): list_display = ('name', 'age') search_fields = ('name',) def get_search_results(self, request, queryset, search_term): queryset, may_have_duplicates = super().get_search_results( request, queryset, search_term, ) try: search_term_as_int = int(search_term) except ValueError: pass else: queryset |= self.model.objects.filter(age=search_term_as_int) return queryset, may_have_duplicatesこの実装は、数値フィールドに対して文字列比較を行う
search_fields = ('name', '=age')に比べて、春香に効率的です... 例えば PostgreSQL では... OR UPPER("polls_choice"."votes"::text) = UPPER('4')となります。
save_relatedメソッドには、HttpRequest、親ModelFormのインスタンス、インラインフォームセットのリスト、親の追加か変更かを表す真偽値が与えられます。このメソッドで、保存の前後に親に対する関係オブジェクトに対する操作を追加できます。この時点では親オブジェクトとそのフォームはすでに保存されていることに注意してください。
- ModelAdmin.get_autocomplete_fields(request)Link to this definition
get_autocomplete_fields()メソッドには、HttpRequestが渡され、上述のModelAdmin.autocomplete_fieldsセクションで説明した通りオートコンプリートウィジェットで表示するフィールドの名前のlistかtupleを返すことが期待されます。
- ModelAdmin.get_readonly_fields(request, obj=None)Link to this definition
get_readonly_fieldsメソッドには、HttpRequestと編集対象のobj(ないし新規追加用のNone) が渡され、上述のModelAdmin.readonly_fieldsセクションで説明した通り、読み込み専用で表示するフィールドの名前のlistかtupleを返すことが期待されます。
- ModelAdmin.get_prepopulated_fields(request, obj=None)Link to this definition
get_prepopulated_fieldsメソッドには、HttpRequestと編集対象のobj(ないし新規追加用のNone) が渡され、上述のModelAdmin.prepopulated_fieldsセクションで説明した通りdictionaryを返すことが期待されます。
- ModelAdmin.get_list_display(request)Link to this definition
get_list_displayメソッドには、HttpRequestが渡され、上述のModelAdmin.list_displayセクションで説明した通りチェンジリストビューで表示するフィールドの名前のlistかtupleを返すことが期待されます。
- ModelAdmin.get_list_display_links(request, list_display)Link to this definition
get_list_display_linksメソッドには、HttpRequestとModelAdmin.get_list_display()によって返されたlistないしtupleが渡されます。上述のModelAdmin.list_display_linksセクションで説明した通り、チェンジリストで変更ビューにリンクを貼りたいフィールドの名前のlistかtuple、もしくはNoneを返すことが期待されます。
- ModelAdmin.get_exclude(request, obj=None)Link to this definition
get_excludeメソッドには、HttpRequestと編集対象のobj(ないし新規追加用のNone) が渡され、上述のModelAdmin.excludeセクションで説明した通りフィールドのリストを返すことが期待されます。
- ModelAdmin.get_fields(request, obj=None)Link to this definition
get_fieldsメソッドには、HttpRequestと編集対象のobj(ないし新規追加用のNone) が渡され、上述のModelAdmin.fieldsセクションで説明した通りフィールドのリストを返すことが期待されます。
- ModelAdmin.get_fieldsets(request, obj=None)Link to this definition
get_fieldsetsメソッドには、HttpRequestと編集対象のobj(ないし新規追加用のNone) が渡され、2 タプルのリストを返すことが期待されます。各 2 タプルは、上述のModelAdmin.fieldsetsセクションで説明した通り admin のフォームページ上の<fieldset>を表します。
- ModelAdmin.get_list_filter(request)Link to this definition
get_list_filterメソッドには、HttpRequestが渡され、list_filter属性のときと同じ種類のシーケンス型を返すことが期待されます。
get_list_select_relatedメソッドには、HttpRequestが渡され、真偽値もしくはModelAdmin.list_select_relatedと同様のリストを返す必要があります。
- ModelAdmin.get_search_fields(request)Link to this definition
get_search_fieldsメソッドには、HttpRequestが渡され、search_fields属性のときと同じ種類のシーケンス型を返すことが期待されます。
- ModelAdmin.get_sortable_by(request)Link to this definition
get_list_displayメソッドには、HttpRequestが渡され、チェンジリストページ並び替え可能にするフィールドの名前の コレクション (例:list、tuple、set) を返すことが期待されます。デフォルトの実装では、セットされている場合は
sortable_byを返します。セットされていなければget_list_display()を参照します。例えば、1 つ以上のカラムを並び替え不可にするには:
class PersonAdmin(admin.ModelAdmin):

    def get_sortable_by(self, request):
        return {*self.get_list_display(request)} - {'rank'}
- ModelAdmin.get_inline_instances(request, obj=None)Link to this definition
The
get_inline_instancesmethod is given theHttpRequestand theobjbeing edited (orNoneon an add form) and is expected to return alistortupleofInlineModelAdminobjects, as described below in theInlineModelAdminsection. For example, the following would return inlines without the default filtering based on add, change, delete, and view permissions:class MyModelAdmin(admin.ModelAdmin): inlines = (MyInline,) def get_inline_instances(self, request, obj=None): return [inline(self.model, self.admin_site) for inline in self.inlines]このメソッドをオーバーライドする場合、返値となるインラインは
inlinesで定義したクラスのインスタンスにしてください。間違えると、関係オブジェクトを追加する際に "Bad Request" が発生する可能性があります。
- ModelAdmin.get_inlines(request, obj)Link to this definition
The
get_inlinesmethod is given theHttpRequestand theobjbeing edited (orNoneon an add form) and is expected to return an iterable of inlines. You can override this method to dynamically add inlines based on the request or model instance instead of specifying them inModelAdmin.inlines.
- ModelAdmin.get_urls()Link to this definition
ModelAdminのget_urlsメソッドは、URLconf と同じ方法で、その ModelAdmin に対して使用される URL を返します。したがって、URL ディスパッチャ と同じように拡張することができます:from django.contrib import admin from django.template.response import TemplateResponse from django.urls import path class MyModelAdmin(admin.ModelAdmin): def get_urls(self): urls = super().get_urls() my_urls = [ path('my_view/', self.my_view), ] return my_urls + urls def my_view(self, request): # ... context = dict( # Include common variables for rendering the admin template. self.admin_site.each_context(request), # Anything else you want in the context... key=value, ) return TemplateResponse(request, "sometemplate.html", context)admin のレイアウトを使用したい場合、
admin/base_site.htmlを extend してください:{% extends "admin/base_site.html" %} {% block content %} ... {% endblock %}However, the
self.my_viewfunction registered above suffers from two problems:It will not perform any permission checks, so it will be accessible to the general public.
It will not provide any header details to prevent caching. This means if the page retrieves data from the database, and caching middleware is active, the page could show outdated information.
Since this is usually not what you want, Django provides a convenience wrapper to check permissions and mark the view as non-cacheable. This wrapper is
AdminSite.admin_view()(i.e.self.admin_site.admin_viewinside aModelAdmininstance); use it like so:class MyModelAdmin(admin.ModelAdmin): def get_urls(self): urls = super().get_urls() my_urls = [ path('my_view/', self.admin_site.admin_view(self.my_view)) ] return my_urls + urlsNotice the wrapped view in the fifth line above:
path('my_view/', self.admin_site.admin_view(self.my_view))This wrapping will protect
self.my_viewfrom unauthorized access and will apply thedjango.views.decorators.cache.never_cache()decorator to make sure it is not cached if the cache middleware is active.If the page is cacheable, but you still want the permission check to be performed, you can pass a
cacheable=Trueargument toAdminSite.admin_view():path('my_view/', self.admin_site.admin_view(self.my_view, cacheable=True))ModelAdminviews havemodel_adminattributes. OtherAdminSiteviews haveadmin_siteattributes.
- ModelAdmin.get_form(request, obj=None, **kwargs)Link to this definition
admin の追加と変更のビューで使うための
ModelFormクラスを返します。add_view()とchange_view()を参照してください。基本の実装は
modelform_factory()を使用してformをサブクラス化し、fieldsやexcludeといった属性によって修正されます。なので、例えばスーパーユーザーに対して追加的なフィールドを与えたい場合は、以下のように基本のフォームを変更することができます:class MyModelAdmin(admin.ModelAdmin): def get_form(self, request, obj=None, **kwargs): if request.user.is_superuser: kwargs['form'] = MySuperuserForm return super().get_form(request, obj, **kwargs)You may also return a custom
ModelFormclass directly.
- ModelAdmin.get_formsets_with_inlines(request, obj=None)Link to this definition
admin の追加や変更のビューで使用するための (
FormSet,InlineModelAdmin) ペアを生成します。例えば、変更ビューのみで特定のインラインを表示したい場合、以下のように
get_formsets_with_inlinesをオーバーライドできます:class MyModelAdmin(admin.ModelAdmin): inlines = [MyInline, SomeOtherInline] def get_formsets_with_inlines(self, request, obj=None): for inline in self.get_inline_instances(request, obj): # hide MyInline in the add view if not isinstance(inline, MyInline) or obj is not None: yield inline.get_formset(request, obj), inline
- ModelAdmin.formfield_for_foreignkey(db_field, request, **kwargs)Link to this definition
ModelAdminのformfield_for_foreignkeyを使うと、ForignKey フィールドに対するデフォルトのフォームフィールドをオーバーライドできます。例えば、ユーザーに基づいてこの ForeignKey フィールドに対するオブジェクトのサブセットを返すには:class MyModelAdmin(admin.ModelAdmin): def formfield_for_foreignkey(self, db_field, request, **kwargs): if db_field.name == "car": kwargs["queryset"] = Car.objects.filter(owner=request.user) return super().formfield_for_foreignkey(db_field, request, **kwargs)これは、
HttpRequestインスタンスを使ってCarForeignKey フィールドをフィルタし、特定のUserインスタンスが所有する car のみを表示します。For more complex filters, you can use
ModelForm.__init__()method to filter based on aninstanceof your model (see Fields which handle relationships). For example:class CountryAdminForm(forms.ModelForm): def __init__(self, *args, **kwargs): super().__init__(*args, **kwargs) self.fields['capital'].queryset = self.instance.cities.all() class CountryAdmin(admin.ModelAdmin): form = CountryAdminForm
- ModelAdmin.formfield_for_manytomany(db_field, request, **kwargs)Link to this definition
formfield_for_foreignkeyメソッドと同じように、formfield_for_manytomanyメソッドをオーバーライドすると ManyToMany に対するデフォルトのフォームフィールドを変更できます。 例えば、あるオーナーは複数の car を所有でき、また car は複数のオーナーに所有されるとすると -- 多対多の関係です --Carのフィールドをフィルタして特定のUserが所有する car だけを表示できます:class MyModelAdmin(admin.ModelAdmin): def formfield_for_manytomany(self, db_field, request, **kwargs): if db_field.name == "cars": kwargs["queryset"] = Car.objects.filter(owner=request.user) return super().formfield_for_manytomany(db_field, request, **kwargs)
- ModelAdmin.formfield_for_choice_field(db_field, request, **kwargs)Link to this definition
formfield_for_foreignkeyやformfield_for_manytomanyメソッドと同じように、formfield_for_choice_fieldメソッドをオーバーライドすると選択肢として宣言されたフィールドに対するデフォルトのフォームフィールドを変更できます。 例えば、スーパーユーザーと通常のスタッフで表示する選択肢を違うものにしたい場合、以下のように記述できます:class MyModelAdmin(admin.ModelAdmin): def formfield_for_choice_field(self, db_field, request, **kwargs): if db_field.name == "status": kwargs['choices'] = ( ('accepted', 'Accepted'), ('denied', 'Denied'), ) if request.user.is_superuser: kwargs['choices'] += (('ready', 'Ready for deployment'),) return super().formfield_for_choice_field(db_field, request, **kwargs)
- ModelAdmin.get_changelist(request, **kwargs)Link to this definition
リスト作成に使われる
Changelist``を返します。デフォルトでは、``django.contrib.admin.views.main.ChangeListが使われます。このクラスを継承することで、リスト作成の挙動を変更することができます。
- ModelAdmin.get_changelist_form(request, **kwargs)Link to this definition
チェンジリストページの
Formsetで使うためのModelFormクラスを返します。カスタムフォームを使うには、例えば:from django import forms class MyForm(forms.ModelForm): pass class MyModelAdmin(admin.ModelAdmin): def get_changelist_form(self, request, **kwargs): return MyForm
- ModelAdmin.get_changelist_formset(request, **kwargs)Link to this definition
list_editableを使っている場合、チェンジリストページで使用するための ModelFormSet クラスを返します。カスタムのフォームセットを使うには、例えば:from django.forms import BaseModelFormSet class MyAdminFormSet(BaseModelFormSet): pass class MyModelAdmin(admin.ModelAdmin): def get_changelist_formset(self, request, **kwargs): kwargs['formset'] = MyAdminFormSet return super().get_changelist_formset(request, **kwargs)
- ModelAdmin.lookup_allowed(lookup, value)Link to this definition
The objects in the changelist page can be filtered with lookups from the URL's query string. This is how
list_filterworks, for example. The lookups are similar to what's used inQuerySet.filter()(e.g.user__email=user@example.com). Since the lookups in the query string can be manipulated by the user, they must be sanitized to prevent unauthorized data exposure.The
lookup_allowed()method is given a lookup path from the query string (e.g.'user__email') and the corresponding value (e.g.'user@example.com'), and returns a boolean indicating whether filtering the changelist'sQuerySetusing the parameters is permitted. Iflookup_allowed()returnsFalse,DisallowedModelAdminLookup(subclass ofSuspiciousOperation) is raised.By default,
lookup_allowed()allows access to a model's local fields, field paths used inlist_filter(but not paths fromget_list_filter()), and lookups required forlimit_choices_toto function correctly inraw_id_fields.Override this method to customize the lookups permitted for your
ModelAdminsubclass.
- ModelAdmin.has_view_permission(request, obj=None)Link to this definition
objの閲覧が許可されている場合はTrueを、そうでなければFalseを返します。obj がNoneの場合、この種類のオブジェクトの閲覧が一般的に許可されているかどうかを表すよう、TrueかFalseを指定します (例えば、Falseは現在のユーザーがこの種類のすべてのオブジェクトを閲覧できないことを意味します)。デフォルトの実装では、ユーザーが "change" か "view" 権限を持っていれば
Trueを返します。
- ModelAdmin.has_add_permission(request)Link to this definition
オブジェクトの追加が許可されていれば
Trueを、そうでなければFalseを返します。
- ModelAdmin.has_change_permission(request, obj=None)Link to this definition
objの編集が許可されている場合はTrueを、そうでなければFalseを返します。objがNoneの場合、この種類のオブジェクトの編集が一般的に許可されているかどうかを表すよう、TrueかFalseを指定します (例えば、Falseは現在のユーザーがこの種類のすべてのオブジェクトを編集できないことを意味します)。
- ModelAdmin.has_delete_permission(request, obj=None)Link to this definition
objの削除が許可されている場合はTrueを、そうでなければFalseを返します。objがNoneの場合、この種類のオブジェクトの削除が一般的に許可されているかどうかを表すよう、TrueかFalseを指定します (例えば、Falseは現在のユーザーがこの種類のすべてのオブジェクトを削除できないことを意味します)。
- ModelAdmin.has_module_permission(request)Link to this definition
admin のインデックスページでモジュールを表示し、そのモジュールへのアクセスを許可する場合は
Trueを、そうでなければFalseを返します。デフォルトではUser.has_module_perms()を使用します。 オーバーライドしても閲覧、追加、変更、削除のアクセス権は制限しません。アクセス権の制限にはhas_view_permission()、has_add_permission()、has_change_permission()、has_delete_permission()を使用してください。
- ModelAdmin.get_queryset(request)Link to this definition
ModelAdminのget_querysetメソッドは admin サイトで編集可能なモデルインスタンスのすべてのQuerySetを返します。このメソッドをオーバーライドする場面の 1 つは、ログイン中のユーザーが所有するオブジェクトを表示することです:class MyModelAdmin(admin.ModelAdmin): def get_queryset(self, request): qs = super().get_queryset(request) if request.user.is_superuser: return qs return qs.filter(author=request.user)
- ModelAdmin.message_user(request, message, level=messages.INFO, extra_tags='', fail_silently=False)Link to this definition
django.contrib.messagesバックエンドを使ってユーザーにメッセージを送ります。custom ModelAdmin example を参照してください。Keyword arguments allow you to change the message level, add extra CSS tags, or fail silently if the
contrib.messagesframework is not installed. These keyword arguments match those fordjango.contrib.messages.add_message(), see that function's documentation for more details. One difference is that the level may be passed as a string label in addition to integer/constant.
- ModelAdmin.get_paginator(request, queryset, per_page, orphans=0, allow_empty_first_page=True)Link to this definition
ビューに対して使う paginator to のインスタンスを返します。デフォルトでは、
paginatorのインスタンスを継承します。
- ModelAdmin.response_add(request, obj, post_url_continue=None)Link to this definition
add_view()ステージに対するHttpResponseを決定します。response_addは、admin フォームが送信され、オブジェクトとすべての関係インスタンスが作成および保存された直後に呼び出されます。オーバーライドすることで、オブジェクトが作成された後のデフォルトの挙動を変更することができます。
- ModelAdmin.response_change(request, obj)Link to this definition
change_view()ステージに対するHttpResponseを決定します。response_changeは、admin フォームが送信され、オブジェクトとすべての関係インスタンスが保存された直後に呼び出されます。オーバーライドすることで、オブジェクトが変更された後のデフォルトの挙動を変更することができます。
- ModelAdmin.response_delete(request, obj_display, obj_id)Link to this definition
delete_view()ステージに対するHttpResponseを決定します。response_deleteは、オブジェクトが削除された後に呼び出されます。オーバーライドすることで、オブジェクトが削除された後のデフォルトの挙動を変更することができます。obj_displayは削除されたオブジェクトの名前を表す文字列です。obj_idis the serialized identifier used to retrieve the object to be deleted.
- ModelAdmin.get_changeform_initial_data(request)Link to this definition
admin の変更フォームの初期データに対するフックです。デフォルトでは、フィールドには
GETパラメータで初期値が与えられます。例えば、?name=initial_valueは``name`` フィールドの初期値をinitial_valueにセットします。このメソッドは、
{'fieldname': 'fieldval'}という形式のディクショナリを返します:def get_changeform_initial_data(self, request): return {'name': 'custom_initial_value'}
- ModelAdmin.get_deleted_objects(objs, request)Link to this definition
A hook for customizing the deletion process of the
delete_view()and the "delete selected" action.The
objsargument is a homogeneous iterable of objects (aQuerySetor a list of model instances) to be deleted, andrequestis theHttpRequest.This method must return a 4-tuple of
(deleted_objects, model_count, perms_needed, protected).deleted_objectsis a list of strings representing all the objects that will be deleted. If there are any related objects to be deleted, the list is nested and includes those related objects. The list is formatted in the template using theunordered_listfilter.model_countis a dictionary mapping each model'sverbose_name_pluralto the number of objects that will be deleted.perms_neededis a set ofverbose_names of the models that the user doesn't have permission to delete.protectedis a list of strings representing of all the protected related objects that can't be deleted. The list is displayed in the template.
その他のメソッドLink to this heading
- ModelAdmin.add_view(request, form_url='', extra_context=None)Link to this definition
モデルインスタンスの追加ページに対する Django のビューです。以下のノートをご覧ください。
- ModelAdmin.change_view(request, object_id, form_url='', extra_context=None)Link to this definition
モデルインスタンスの編集ページに対する Django のビューです。以下のノートをご覧ください。
- ModelAdmin.changelist_view(request, extra_context=None)Link to this definition
モデルインスタンスの変更リストおよびアクションページに対する Django のビューです。以下のノートをご覧ください。
- ModelAdmin.delete_view(request, object_id, extra_context=None)Link to this definition
モデルインスタンスの削除の確認ページに対する Django のビューです。以下のノートをご覧ください。
- ModelAdmin.history_view(request, object_id, extra_context=None)Link to this definition
与えられたモデルのインスタンスに対する修正履歴を表示するページに対する Django のビューです。
Unlike the hook-type ModelAdmin methods detailed in the previous section,
these five methods are in reality designed to be invoked as Django views from
the admin application URL dispatching handler to render the pages that deal
with model instances CRUD operations. As a result, completely overriding these
methods will significantly change the behavior of the admin application.
One common reason for overriding these methods is to augment the context data that is provided to the template that renders the view. In the following example, the change view is overridden so that the rendered template is provided some extra mapping data that would not otherwise be available:
class MyModelAdmin(admin.ModelAdmin):

    # A template for a very customized change view:
    change_form_template = 'admin/myapp/extras/openstreetmap_change_form.html'

    def get_osm_info(self):
        # ...
        pass

    def change_view(self, request, object_id, form_url='', extra_context=None):
        extra_context = extra_context or {}
        extra_context['osm_data'] = self.get_osm_info()
        return super().change_view(
            request, object_id, form_url, extra_context=extra_context,
        )
These views return TemplateResponse
instances which allow you to easily customize the response data before
rendering. For more details, see the TemplateResponse documentation.
ModelAdmin アセットの定義Link to this heading
ビューを追加したり変更したりするために、CSS や JavaScript を追加したいことがあるかもしれません。そういうときには ModelAdmin の Media インナークラスを使用します:
class ArticleAdmin(admin.ModelAdmin):
    class Media:
        css = {
            "all": ("my_styles.css",)
        }
        js = ("my_code.js",)
staticfiles app は、すべてのアセットのパスに STATIC_URL (STATIC_URL が None の場合は MEDIA_URL) を prepend します。regular asset definitions on forms と同じルールが適用されます。
jQueryLink to this heading
Django admin の JavaScript は jQuery ライブラリを使用します。
To avoid conflicts with user-supplied scripts or libraries, Django's jQuery
(version 3.5.1) is namespaced as django.jQuery. If you want to use jQuery
in your own admin JavaScript without including a second copy, you can use the
django.jQuery object on changelist and add/edit views. Also, your own admin
forms or widgets depending on django.jQuery must specify
js=['admin/js/jquery.init.js', …] when declaring form media assets.
ModelAdmin クラスはデフォルトで jQuery を要件とするので、特別なニーズがない限り jQuery をメディアリソースの ModelAdmin のリストに追加する必要はありません。例えば、jQuery ライブラリがグローバルな名前空間を持つ必要がある場合 (例えばサードパーティの jQuery プラグインを使用する場合など)、もしくは jQuery の新しいバージョンを使いたい場合には、自分自身でコピーを用意する必要があります。
Django には、非圧縮と 'minified' のバージョンのjQuery があり、それぞれ jquery.js と``jquery.min.js`` となっています。
ModelAdmin and InlineModelAdmin have a media property
that returns a list of Media objects which store paths to the JavaScript
files for the forms and/or formsets. If DEBUG is True it will
return the uncompressed versions of the various JavaScript files, including
jquery.js; if not, it will return the 'minified' versions.
カスタムのバリデーションを admin に追加するLink to this heading
You can also add custom validation of data in the admin. The automatic admin
interface reuses django.forms, and the ModelAdmin class gives you
the ability to define your own form:
class ArticleAdmin(admin.ModelAdmin):
    form = MyArticleAdminForm
MyArticleAdminForm can be defined anywhere as long as you import where
needed. Now within your form you can add your own custom validation for
any field:
class MyArticleAdminForm(forms.ModelForm):
    def clean_name(self):
        # do something that validates your data
        return self.cleaned_data["name"]
It is important you use a ModelForm here otherwise things can break. See
the forms documentation on custom validation and, more specifically, the
model form validation notes for more
information.
InlineModelAdmin オブジェクトLink to this heading
- class InlineModelAdminLink to this definition
- class TabularInlineLink to this definition
- class StackedInlineLink to this definition
admin インターフェースには、親モデルと同じページでモデルを編集する機能があります。この機能をインラインと呼びます。以下の 2 つのモデルがあるとしましょう:
from django.db import models

class Author(models.Model):
   name = models.CharField(max_length=100)

class Book(models.Model):
   author = models.ForeignKey(Author, on_delete=models.CASCADE)
   title = models.CharField(max_length=100)
author のページで、author が書いた book を編集することができます。
ModelAdmin.inlines内でモデルに対するインラインを追加します:from django.contrib import admin class BookInline(admin.TabularInline): model = Book class AuthorAdmin(admin.ModelAdmin): inlines = [ BookInline, ]Django には、以下の通り
InlineModelAdminのサブクラスが 2 つあります:この 2 つの違いは、単に描画するために使われるテンプレートの違いです。
InlineModelAdmin のオプションLink to this heading
InlineModelAdmin は ModelAdmin と多くの機能を共有しており、さらにいくつかの独自の機能を有しています (共有の機能は実際には BaseModelAdmin スーパークラスで定義されています)。共有の機能は:
InlineModelAdmin クラスは、以下を追加またはカスタマイズしています:
- InlineModelAdmin.modelLink to this definition
インラインが使用するモデルです。これは必須です。
- InlineModelAdmin.fk_nameLink to this definition
モデルの外部キーの名前です。多くの場合、これは自動的に処理されますが、同じ親モデルに対して複数の外部キーがある場合には
fk_nameを明示的に指定する必要があります。
- InlineModelAdmin.formsetLink to this definition
これはデフォルトでは
BaseInlineFormSetです。自分自身のフォームセットを使用すると、カスタマイズの幅が広がります。インラインは model formsets にて構築されます。
- InlineModelAdmin.formLink to this definition
formに対する値で、デフォルトはModelFormです。これは、このインラインに対してフォームセットが生成される際にinlineformset_factory()に渡されるものです。
- InlineModelAdmin.classesLink to this definition
インラインに対して描画するフォームセットに適用する、追加的な CSS クラスのリストないしタプルです。デフォルトは
Noneです。fieldsetsで設定したクラスと同様に、collapseクラスを伴うインラインは最初は折りたたまれており小さな "show" リンクを持ちます。
- InlineModelAdmin.extraLink to this definition
This controls the number of extra forms the formset will display in addition to the initial forms. Defaults to 3. See the formsets documentation for more information.
JavaScript が有効なブラウザを使っているユーザーに対しては、"1 つ追加" のリンクが提供され、
extra引数の結果提供されるインラインに加えていくつでもインラインを追加することができます。The dynamic link will not appear if the number of currently displayed forms exceeds
max_num, or if the user does not have JavaScript enabled.InlineModelAdmin.get_extra()でも追加フォームの数をカスタマイズできます。
- InlineModelAdmin.max_numLink to this definition
インラインに表示するフォームの最大数をコントロールします。オブジェクトの買うと直接関係はありませんが、値が小さい場合には関係する可能性があります。詳しくは Limiting the number of editable objects を参照してください。
InlineModelAdmin.get_max_num()でも追加フォームの最大数をカスタマイズできます。
- InlineModelAdmin.min_numLink to this definition
インラインに表示するフォームの最小数をコントロールします。詳しくは
modelformset_factory()を参照してください。InlineModelAdmin.get_min_num()でも追加フォームの最小数をカスタマイズできます。
- InlineModelAdmin.raw_id_fieldsLink to this definition
デフォルトでは、
ForeignKeyのフィールドに対して Django の admin はセレクトボックスのインターフェース (<select>) を使用します。ドロップダウン内に表示する関係インスタンスをすべて選択するオーバーヘッドから逃れたいこともあるでしょう。raw_id_fieldsは、ForeignKeyやManyToManyFieldに対するInputウィジェットを適用したいフィールドのリストです:class BookInline(admin.TabularInline): model = Book raw_id_fields = ("pages",)
- InlineModelAdmin.templateLink to this definition
ページ上でインラインを描画するのに使われるテンプレートです。
- InlineModelAdmin.verbose_nameLink to this definition
モデルのインナー
Metaクラス内で見つかったverbose_nameのオーバーライドです。
- InlineModelAdmin.verbose_name_pluralLink to this definition
モデルのインナー
Metaクラス内で見つかったverbose_name_pluralのオーバーライドです。
- InlineModelAdmin.can_deleteLink to this definition
インライン内でインラインオブジェクトを削除可能にするかどうかを指定します。デフォルトは
Trueです。
- InlineModelAdmin.show_change_linkLink to this definition
admin 内で変更可能なインラインオブジェクトをが変更フォームへのリンクを持つかどうかを指定します。デフォルトは
Falseです。
- InlineModelAdmin.get_formset(request, obj=None, **kwargs)Link to this definition
Returns a
BaseInlineFormSetclass for use in admin add/change views.objis the parent object being edited orNonewhen adding a new parent. See the example forModelAdmin.get_formsets_with_inlines.
- InlineModelAdmin.get_extra(request, obj=None, **kwargs)Link to this definition
使用する追加インラインフォームの数を返します。デフォルトでは、
InlineModelAdmin.extra属性を返します。プログラムに従って追加インラインフォームの数を決めたい場合、このメソッドをオーバーライドしてください。例えば、モデルインスタンス (キーワード引数の
objで渡されています) に基づいて数を決められます:class BinaryTreeAdmin(admin.TabularInline): model = BinaryTree def get_extra(self, request, obj=None, **kwargs): extra = 2 if obj: return extra - obj.binarytree_set.count() return extra
- InlineModelAdmin.get_max_num(request, obj=None, **kwargs)Link to this definition
使用する追加インラインフォームの最大数を返します。デフォルトでは、
InlineModelAdmin.max_num属性を返します。プログラムに従ってインラインフォームの最大数を決めたい場合、このメソッドをオーバーライドしてください。例えば、モデルインスタンス (キーワード引数の
objで渡されています) に基づいて最大数を決められます:class BinaryTreeAdmin(admin.TabularInline): model = BinaryTree def get_max_num(self, request, obj=None, **kwargs): max_num = 10 if obj and obj.parent: return max_num - 5 return max_num
- InlineModelAdmin.get_min_num(request, obj=None, **kwargs)Link to this definition
使用する追加インラインフォームの最小数を返します。デフォルトでは、
InlineModelAdmin.min_num属性を返します。プログラムに従ってインラインフォームの最小数を決めたい場合、このメソッドをオーバーライドしてください。例えば、モデルインスタンス (キーワード引数の
objで渡されています) に基づいて最小数を決められます:
- InlineModelAdmin.has_add_permission(request, obj)Link to this definition
インラインオブジェクトの追加が許可されている場合
Trueを、そうでなければFalseを返します。objは編集される親オブジェクトか、新規追加の場合にはNoneとなります。
- InlineModelAdmin.has_change_permission(request, obj=None)Link to this definition
インラインオブジェクトの編集が許可されている場合
Trueを、そうでなければFalseを返します。objは編集される親オブジェクトです。
- InlineModelAdmin.has_delete_permission(request, obj=None)Link to this definition
インラインオブジェクトの削除が許可されている場合
Trueを、そうでなければFalseを返します。objは編集される親オブジェクトです。
同じ親モデルへの複数の外部キーを持つモデルを扱うLink to this heading
同じモデルに対する複数の外部キーを持つこともあり得ます。例として以下のモデルを見てみましょう:
from django.db import models

class Friendship(models.Model):
    to_person = models.ForeignKey(Person, on_delete=models.CASCADE, related_name="friends")
    from_person = models.ForeignKey(Person, on_delete=models.CASCADE, related_name="from_friends")
Person の admin の追加や変更ページでインラインを表示したい場合は、自動的に判別することができないため、外部キーを明示的に定義する必要があります:
from django.contrib import admin
from myapp.models import Friendship

class FriendshipInline(admin.TabularInline):
    model = Friendship
    fk_name = "to_person"

class PersonAdmin(admin.ModelAdmin):
    inlines = [
        FriendshipInline,
    ]
多対多のモデルを扱うLink to this heading
By default, admin widgets for many-to-many relations will be displayed
on whichever model contains the actual reference to the
ManyToManyField. Depending on your ModelAdmin
definition, each many-to-many field in your model will be represented by a
standard HTML <select multiple>, a horizontal or vertical filter, or a
raw_id_fields widget. However, it is also possible to replace these
widgets with inlines.
Suppose we have the following models:
from django.db import models

class Person(models.Model):
    name = models.CharField(max_length=128)

class Group(models.Model):
    name = models.CharField(max_length=128)
    members = models.ManyToManyField(Person, related_name='groups')
If you want to display many-to-many relations using an inline, you can do
so by defining an InlineModelAdmin object for the relationship:
from django.contrib import admin

class MembershipInline(admin.TabularInline):
    model = Group.members.through

class PersonAdmin(admin.ModelAdmin):
    inlines = [
        MembershipInline,
    ]

class GroupAdmin(admin.ModelAdmin):
    inlines = [
        MembershipInline,
    ]
    exclude = ('members',)
There are two features worth noting in this example.
Firstly - the MembershipInline class references Group.members.through.
The through attribute is a reference to the model that manages the
many-to-many relation. This model is automatically created by Django when you
define a many-to-many field.
Secondly, the GroupAdmin must manually exclude the members field.
Django displays an admin widget for a many-to-many field on the model that
defines the relation (in this case, Group). If you want to use an inline
model to represent the many-to-many relationship, you must tell Django's admin
to not display this widget - otherwise you will end up with two widgets on
your admin page for managing the relation.
Note that when using this technique the
m2m_changed signals aren't triggered. This
is because as far as the admin is concerned, through is just a model with
two foreign key fields rather than a many-to-many relation.
In all other respects, the InlineModelAdmin is exactly the same as any
other. You can customize the appearance using any of the normal
ModelAdmin properties.
Working with many-to-many intermediary modelsLink to this heading
When you specify an intermediary model using the through argument to a
ManyToManyField, the admin will not display a
widget by default. This is because each instance of that intermediary model
requires more information than could be displayed in a single widget, and the
layout required for multiple widgets will vary depending on the intermediate
model.
However, we still want to be able to edit that information inline. Fortunately, we can do this with inline admin models. Suppose we have the following models:
from django.db import models

class Person(models.Model):
    name = models.CharField(max_length=128)

class Group(models.Model):
    name = models.CharField(max_length=128)
    members = models.ManyToManyField(Person, through='Membership')

class Membership(models.Model):
    person = models.ForeignKey(Person, on_delete=models.CASCADE)
    group = models.ForeignKey(Group, on_delete=models.CASCADE)
    date_joined = models.DateField()
    invite_reason = models.CharField(max_length=64)
The first step in displaying this intermediate model in the admin is to
define an inline class for the Membership model:
class MembershipInline(admin.TabularInline):
    model = Membership
    extra = 1
This example uses the default InlineModelAdmin values for the
Membership model, and limits the extra add forms to one. This could be
customized using any of the options available to InlineModelAdmin classes.
Now create admin views for the Person and Group models:
class PersonAdmin(admin.ModelAdmin):
    inlines = (MembershipInline,)

class GroupAdmin(admin.ModelAdmin):
    inlines = (MembershipInline,)
Finally, register your Person and Group models with the admin site:
admin.site.register(Person, PersonAdmin)
admin.site.register(Group, GroupAdmin)
Now your admin site is set up to edit Membership objects inline from
either the Person or the Group detail pages.
Using generic relations as an inlineLink to this heading
It is possible to use an inline with generically related objects. Let's say you have the following models:
from django.contrib.contenttypes.fields import GenericForeignKey
from django.db import models

class Image(models.Model):
    image = models.ImageField(upload_to="images")
    content_type = models.ForeignKey(ContentType, on_delete=models.CASCADE)
    object_id = models.PositiveIntegerField()
    content_object = GenericForeignKey("content_type", "object_id")

class Product(models.Model):
    name = models.CharField(max_length=100)
If you want to allow editing and creating an Image instance on the
Product, add/change views you can use
GenericTabularInline
or GenericStackedInline (both
subclasses of GenericInlineModelAdmin)
provided by admin. They implement tabular
and stacked visual layouts for the forms representing the inline objects,
respectively, just like their non-generic counterparts. They behave just like
any other inline. In your admin.py for this example app:
from django.contrib import admin
from django.contrib.contenttypes.admin import GenericTabularInline

from myapp.models import Image, Product

class ImageInline(GenericTabularInline):
    model = Image

class ProductAdmin(admin.ModelAdmin):
    inlines = [
        ImageInline,
    ]

admin.site.register(Product, ProductAdmin)
See the contenttypes documentation for more specific information.
Overriding admin templatesLink to this heading
You can override many of the templates which the admin module uses to generate the various pages of an admin site. You can even override a few of these templates for a specific app, or a specific model.
Set up your projects admin template directoriesLink to this heading
The admin template files are located in the contrib/admin/templates/admin
directory.
In order to override one or more of them, first create an admin directory
in your project's templates directory. This can be any of the directories
you specified in the DIRS option of the
DjangoTemplates backend in the TEMPLATES setting. If you have
customized the 'loaders' option, be sure
'django.template.loaders.filesystem.Loader' appears before
'django.template.loaders.app_directories.Loader' so that your custom
templates will be found by the template loading system before those that are
included with django.contrib.admin.
Within this admin directory, create sub-directories named after your app.
Within these app subdirectories create sub-directories named after your models.
Note, that the admin app will lowercase the model name when looking for the
directory, so make sure you name the directory in all lowercase if you are
going to run your app on a case-sensitive filesystem.
To override an admin template for a specific app, copy and edit the template
from the django/contrib/admin/templates/admin directory, and save it to one
of the directories you just created.
For example, if we wanted to add a tool to the change list view for all the
models in an app named my_app, we would copy
contrib/admin/templates/admin/change_list.html to the
templates/admin/my_app/ directory of our project, and make any necessary
changes.
If we wanted to add a tool to the change list view for only a specific model
named 'Page', we would copy that same file to the
templates/admin/my_app/page directory of our project.
Overriding vs. replacing an admin templateLink to this heading
Because of the modular design of the admin templates, it is usually neither necessary nor advisable to replace an entire template. It is almost always better to override only the section of the template which you need to change.
To continue the example above, we want to add a new link next to the
History tool for the Page model. After looking at change_form.html
we determine that we only need to override the object-tools-items block.
Therefore here is our new change_form.html :
{% extends "admin/change_form.html" %}
{% load i18n admin_urls %}
{% block object-tools-items %}
    <li>
        <a href="{% url opts|admin_urlname:'history' original.pk|admin_urlquote %}" class="historylink">{% translate "History" %}</a>
    </li>
    <li>
        <a href="mylink/" class="historylink">My Link</a>
    </li>
    {% if has_absolute_url %}
        <li>
            <a href="{% url 'admin:view_on_site' content_type_id original.pk %}" class="viewsitelink">{% translate "View on site" %}</a>
        </li>
    {% endif %}
{% endblock %}
And that's it! If we placed this file in the templates/admin/my_app
directory, our link would appear on the change form for all models within
my_app.
Templates which may be overridden per app or modelLink to this heading
Not every template in contrib/admin/templates/admin may be overridden per
app or per model. The following can:
actions.htmlapp_index.htmlchange_form.htmlchange_form_object_tools.htmlchange_list.htmlchange_list_object_tools.htmlchange_list_results.htmldate_hierarchy.htmldelete_confirmation.htmlobject_history.htmlpagination.htmlpopup_response.htmlprepopulated_fields_js.htmlsearch_form.htmlsubmit_line.html
For those templates that cannot be overridden in this way, you may still
override them for your entire project by placing the new version in your
templates/admin directory. This is particularly useful to create custom 404
and 500 pages.
Root and login templatesLink to this heading
If you wish to change the index, login or logout templates, you are better off
creating your own AdminSite instance (see below), and changing the
AdminSite.index_template , AdminSite.login_template or
AdminSite.logout_template properties.
Theming supportLink to this heading
The admin uses CSS variables to define colors. This allows changing colors
without having to override many individual CSS rules. For example, if you
preferred purple instead of blue you could add a admin/base.html template
override to your project:
{% extends 'admin/base.html' %}

{% block extrastyle %}{{ block.super }}
<style>
:root {
  --primary: #9774d5;
  --secondary: #785cab;
  --link-fg: #7c449b;
  --link-selected-fg: #8f5bb2;
}
</style>
{% endblock %}
A dark theme is defined, and applied respecting the prefers-color-scheme media query.
The list of CSS variables are defined at
django/contrib/admin/static/admin/css/base.css.
AdminSite objectsLink to this heading
- class AdminSite(name='admin')Link to this definition
A Django administrative site is represented by an instance of
django.contrib.admin.sites.AdminSite; by default, an instance of this class is created asdjango.contrib.admin.siteand you can register your models andModelAdmininstances with it.If you want to customize the default admin site, you can override it.
When constructing an instance of an
AdminSite, you can provide a unique instance name using thenameargument to the constructor. This instance name is used to identify the instance, especially when reversing admin URLs. If no instance name is provided, a default instance name ofadminwill be used. See Customizing the AdminSite class for an example of customizing theAdminSiteclass.
AdminSite の属性Link to this heading
Templates can override or extend base admin templates as described in Overriding admin templates.
- AdminSite.site_headerLink to this definition
The text to put at the top of each admin page, as an
<h1>(a string). By default, this is "Django administration".
- AdminSite.site_titleLink to this definition
The text to put at the end of each admin page's
<title>(a string). By default, this is "Django site admin".
- AdminSite.site_urlLink to this definition
The URL for the "View site" link at the top of each admin page. By default,
site_urlis/. Set it toNoneto remove the link.For sites running on a subpath, the
each_context()method checks if the current request hasrequest.META['SCRIPT_NAME']set and uses that value ifsite_urlisn't set to something other than/.
- AdminSite.index_titleLink to this definition
The text to put at the top of the admin index page (a string). By default, this is "Site administration".
- AdminSite.index_templateLink to this definition
Path to a custom template that will be used by the admin site main index view.
- AdminSite.app_index_templateLink to this definition
Path to a custom template that will be used by the admin site app index view.
- AdminSite.empty_value_displayLink to this definition
The string to use for displaying empty values in the admin site's change list. Defaults to a dash. The value can also be overridden on a per
ModelAdminbasis and on a custom field within aModelAdminby setting anempty_value_displayattribute on the field. SeeModelAdmin.empty_value_displayfor examples.
-
A boolean value that determines whether to show the navigation sidebar on larger screens. By default, it is set to
True.
- AdminSite.final_catch_all_viewLink to this definition
-
A boolean value that determines whether to add a final catch-all view to the admin that redirects unauthenticated users to the login page. By default, it is set to
True.
- AdminSite.login_templateLink to this definition
Path to a custom template that will be used by the admin site login view.
- AdminSite.login_formLink to this definition
Subclass of
AuthenticationFormthat will be used by the admin site login view.
- AdminSite.logout_templateLink to this definition
Path to a custom template that will be used by the admin site logout view.
- AdminSite.password_change_templateLink to this definition
Path to a custom template that will be used by the admin site password change view.
- AdminSite.password_change_done_templateLink to this definition
Path to a custom template that will be used by the admin site password change done view.
AdminSite のメソッドLink to this heading
- AdminSite.each_context(request)Link to this definition
Returns a dictionary of variables to put in the template context for every page in the admin site.
Includes the following variables and values by default:
site_header:AdminSite.site_headersite_title:AdminSite.site_titlesite_url:AdminSite.site_urlhas_permission:AdminSite.has_permission()available_apps: a list of applications from the application registry available for the current user. Each entry in the list is a dict representing an application with the following keys:app_label: the application labelapp_url: the URL of the application index in the adminhas_module_perms: a boolean indicating if displaying and accessing of the module's index page is permitted for the current usermodels: a list of the models available in the application
Each model is a dict with the following keys:
object_name: class name of the modelname: plural name of the modelperms: adicttrackingadd,change,delete, andviewpermissionsadmin_url: admin changelist URL for the modeladd_url: admin URL to add a new model instance
- AdminSite.has_permission(request)Link to this definition
Returns
Trueif the user for the givenHttpRequesthas permission to view at least one page in the admin site. Defaults to requiring bothUser.is_activeandUser.is_staffto beTrue.
- AdminSite.register(model_or_iterable, admin_class=None, **options)Link to this definition
Registers the given model class (or iterable of classes) with the given
admin_class.admin_classdefaults toModelAdmin(the default admin options). If keyword arguments are given -- e.g.list_display-- they'll be applied as options to the admin class.Raises
ImproperlyConfiguredif a model is abstract. anddjango.contrib.admin.sites.AlreadyRegisteredif a model is already registered.
- AdminSite.unregister(model_or_iterable)Link to this definition
Unregisters the given model class (or iterable of classes).
Raises
django.contrib.admin.sites.NotRegisteredif a model isn't already registered.
Hooking AdminSite instances into your URLconfLink to this heading
The last step in setting up the Django admin is to hook your AdminSite
instance into your URLconf. Do this by pointing a given URL at the
AdminSite.urls method. It is not necessary to use
include().
In this example, we register the default AdminSite instance
django.contrib.admin.site at the URL /admin/
# urls.py
from django.contrib import admin
from django.urls import path

urlpatterns = [
    path('admin/', admin.site.urls),
]
Customizing the AdminSite classLink to this heading
If you'd like to set up your own admin site with custom behavior, you're free
to subclass AdminSite and override or add anything you like. Then, create
an instance of your AdminSite subclass (the same way you'd instantiate any
other Python class) and register your models and ModelAdmin subclasses with
it instead of with the default site. Finally, update myproject/urls.py
to reference your AdminSite subclass.
myapp/admin.pyfrom django.contrib.admin import AdminSite
from .models import MyModel
class MyAdminSite(AdminSite):
site_header = 'Monty Python administration'
admin_site = MyAdminSite(name='myadmin')
admin_site.register(MyModel)
myproject/urls.pyfrom django.urls import path
from myapp.admin import admin_site
urlpatterns = [
path('myadmin/', admin_site.urls),
]
Note that you may not want autodiscovery of admin modules when using your
own AdminSite instance since you will likely be importing all the per-app
admin modules in your myproject.admin module. This means you need to
put 'django.contrib.admin.apps.SimpleAdminConfig' instead of
'django.contrib.admin' in your INSTALLED_APPS setting.
Overriding the default admin siteLink to this heading
You can override the default django.contrib.admin.site by setting the
default_site attribute of a custom AppConfig
to the dotted import path of either a AdminSite subclass or a callable that
returns a site instance.
myproject/admin.pyfrom django.contrib import admin
class MyAdminSite(admin.AdminSite):
...
myproject/apps.pyfrom django.contrib.admin.apps import AdminConfig
class MyAdminConfig(AdminConfig):
default_site = 'myproject.admin.MyAdminSite'
myproject/settings.pyINSTALLED_APPS = [
...
'myproject.apps.MyAdminConfig', # replaces 'django.contrib.admin'
...
]
Multiple admin sites in the same URLconfLink to this heading
You can create multiple instances of the admin site on the same Django-powered
website. Create multiple instances of AdminSite and place each one at a
different URL.
In this example, the URLs /basic-admin/ and /advanced-admin/ feature
separate versions of the admin site -- using the AdminSite instances
myproject.admin.basic_site and myproject.admin.advanced_site,
respectively:
# urls.py
from django.urls import path
from myproject.admin import advanced_site, basic_site

urlpatterns = [
    path('basic-admin/', basic_site.urls),
    path('advanced-admin/', advanced_site.urls),
]
AdminSite instances take a single argument to their constructor, their
name, which can be anything you like. This argument becomes the prefix to the
URL names for the purposes of reversing them. This
is only necessary if you are using more than one AdminSite.
Adding views to admin sitesLink to this heading
Just like ModelAdmin, AdminSite provides a
get_urls() method
that can be overridden to define additional views for the site. To add
a new view to your admin site, extend the base
get_urls() method to include
a pattern for your new view.
Adding a password reset featureLink to this heading
You can add a password reset feature to the admin site by adding a few lines to your URLconf. Specifically, add these four patterns:
from django.contrib.auth import views as auth_views

path(
    'admin/password_reset/',
    auth_views.PasswordResetView.as_view(),
    name='admin_password_reset',
),
path(
    'admin/password_reset/done/',
    auth_views.PasswordResetDoneView.as_view(),
    name='password_reset_done',
),
path(
    'reset/<uidb64>/<token>/',
    auth_views.PasswordResetConfirmView.as_view(),
    name='password_reset_confirm',
),
path(
    'reset/done/',
    auth_views.PasswordResetCompleteView.as_view(),
    name='password_reset_complete',
),
(This assumes you've added the admin at admin/ and requires that you put
the URLs starting with ^admin/ before the line that includes the admin app
itself).
The presence of the admin_password_reset named URL will cause a "forgotten
your password?" link to appear on the default admin log-in page under the
password box.
LogEntry objectsLink to this heading
- class models.LogEntryLink to this definition
The
LogEntryclass tracks additions, changes, and deletions of objects done through the admin interface.
LogEntry attributesLink to this heading
- LogEntry.action_timeLink to this definition
The date and time of the action.
- LogEntry.userLink to this definition
The user (an
AUTH_USER_MODELinstance) who performed the action.
- LogEntry.content_typeLink to this definition
The
ContentTypeof the modified object.
- LogEntry.object_idLink to this definition
The textual representation of the modified object's primary key.
- LogEntry.object_reprLink to this definition
The object`s
repr()after the modification.
- LogEntry.action_flagLink to this definition
The type of action logged:
ADDITION,CHANGE,DELETION.For example, to get a list of all additions done through the admin:
from django.contrib.admin.models import ADDITION, LogEntry

LogEntry.objects.filter(action_flag=ADDITION)
- LogEntry.change_messageLink to this definition
The detailed description of the modification. In the case of an edit, for example, the message contains a list of the edited fields. The Django admin site formats this content as a JSON structure, so that
get_change_message()can recompose a message translated in the current user language. Custom code might set this as a plain string though. You are advised to use theget_change_message()method to retrieve this value instead of accessing it directly.
LogEntry methodsLink to this heading
- LogEntry.get_edited_object()Link to this definition
A shortcut that returns the referenced object.
- LogEntry.get_change_message()Link to this definition
Formats and translates
change_messageinto the current user language. Messages created before Django 1.10 will always be displayed in the language in which they were logged.
Reversing admin URLsLink to this heading
When an AdminSite is deployed, the views provided by that site are
accessible using Django's URL reversing system.
The AdminSite provides the following named URL patterns:
Page |
URL name |
パラメータ |
|---|---|---|
目次 |
|
|
Login |
|
|
Logout |
|
|
パスワードの変更 |
|
|
Password change done |
|
|
i18n JavaScript |
|
|
Application index page |
|
|
Redirect to object's page |
|
|
Each ModelAdmin instance provides an additional set of named URLs:
Page |
URL name |
パラメータ |
|---|---|---|
Changelist |
|
|
追加 |
|
|
履歴 |
|
|
削除 |
|
|
変更 |
|
|
The UserAdmin provides a named URL:
Page |
URL name |
パラメータ |
|---|---|---|
パスワードの変更 |
|
|
These named URLs are registered with the application namespace admin, and
with an instance namespace corresponding to the name of the Site instance.
So - if you wanted to get a reference to the Change view for a particular
Choice object (from the polls application) in the default admin, you would
call:
>>> from django.urls import reverse
>>> c = Choice.objects.get(...)
>>> change_url = reverse('admin:polls_choice_change', args=(c.id,))
This will find the first registered instance of the admin application
(whatever the instance name), and resolve to the view for changing
poll.Choice instances in that instance.
If you want to find a URL in a specific admin instance, provide the name of
that instance as a current_app hint to the reverse call. For example,
if you specifically wanted the admin view from the admin instance named
custom, you would need to call:
>>> change_url = reverse('admin:polls_choice_change', args=(c.id,), current_app='custom')
For more details, see the documentation on reversing namespaced URLs.
To allow easier reversing of the admin urls in templates, Django provides an
admin_urlname filter which takes an action as argument:
{% load admin_urls %}
<a href="{% url opts|admin_urlname:'add' %}">Add user</a>
<a href="{% url opts|admin_urlname:'delete' user.pk %}">Delete this user</a>
The action in the examples above match the last part of the URL names for
ModelAdmin instances described above. The opts variable can be any
object which has an app_label and model_name attributes and is usually
supplied by the admin views for the current model.
The display decoratorLink to this heading
- display(*, boolean=None, ordering=None, description=None, empty_value=None)Link to this definition
-
This decorator can be used for setting specific attributes on custom display functions that can be used with
list_displayorreadonly_fields:@admin.display( boolean=True, ordering='-publish_date', description='Is Published?', ) def is_published(self, obj): return obj.publish_date is not NoneThis is equivalent to setting some attributes (with the original, longer names) on the function directly:
def is_published(self, obj):
    return obj.publish_date is not None
is_published.boolean = True
is_published.admin_order_field = '-publish_date'
is_published.short_description = 'Is Published?'
Also note that the
empty_valuedecorator parameter maps to theempty_value_displayattribute assigned directly to the function. It cannot be used in conjunction withboolean-- they are mutually exclusive.Use of this decorator is not compulsory to make a display function, but it can be useful to use it without arguments as a marker in your source to identify the purpose of the function:
@admin.display
def published_year(self, obj):
    return obj.publish_date.year
In this case it will add no attributes to the function.
The staff_member_required decoratorLink to this heading
- staff_member_required(redirect_field_name='next', login_url='admin:login')Link to this definition
This decorator is used on the admin views that require authorization. A view decorated with this function will have the following behavior:
If the user is logged in, is a staff member (
User.is_staff=True), and is active (User.is_active=True), execute the view normally.Otherwise, the request will be redirected to the URL specified by the
login_urlparameter, with the originally requested path in a query string variable specified byredirect_field_name. For example:/admin/login/?next=/admin/polls/question/3/.
使い方の例:
from django.contrib.admin.views.decorators import staff_member_required

@staff_member_required
def my_view(request):
    ...